The attendance feature includes real-time check-in and check-out functionality to track participant drop-off as well as trusted contacts who are authorized for participant pick-up. You may also track participant attendance at specific programs or classes, and edit attendance records to keep your check-in and attendance records accurate.
In this article:
Check-In
When your participants arrive and depart from your organization, you can check them in and out in real time. Participants can be checked in and out by either one of their Trusted Contacts or by a Universal Contact in your organization. Additionally, you can enable Bypass Mode and use the Universal Contact to quickly check in or out many participants at once.
It is important to know that, as a provider, you must have the Attendance Taking Edit permission to check participants in and out, and you must be registered to the top-level of the organization. In addition, a participant must be registered to a current session in order to see them in a list and check them in and out.
In this section:
Create a Check In/Out List
Before you can check your participants in/out, select a saved list or create a new list using the filters from the Check-In List Builder.
Note: By default, all active participants will appear unless you filter for a specific group.
To create a Check In/Out List:
- In the Menu, click Attendance.
- In the submenu that appears, click Check In.
- In the Check-In List Builder, add a condition or multiple conditions to create your Check In/Out List.
- Click the VIEW PARTICIPANT LIST button.
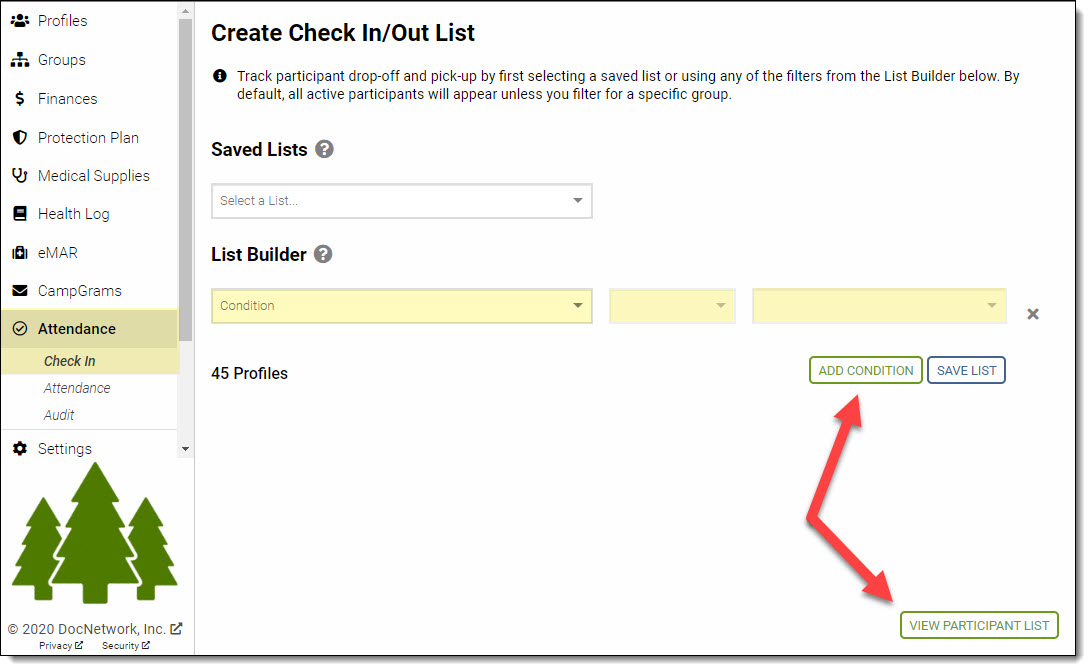
Time Saving Tip! You can click the SAVE LIST button to save a Check In/Out List or overwrite an existing one so you do not have to recreate the same lists over and over. You can also share your lists with others in your organization. Your saved lists can be found in the Saved Lists box in the upper-left corner of the page.
Check Participants In/Out Using Trusted Contacts
After you click the VIEW PARTICIPANT LIST, if you do not have Bypass Trusted Contacts enabled, you will see a list of participants. If you have Bypass Trusted Contacts enabled, you will see a page with three tabs:
- Off
- Check In
- Check Out
The Check In and Check Out buttons both function as On buttons for the Bypass Trusted Contacts, so if you would like to check in/out multiple participants at a time, click the appropriate button.
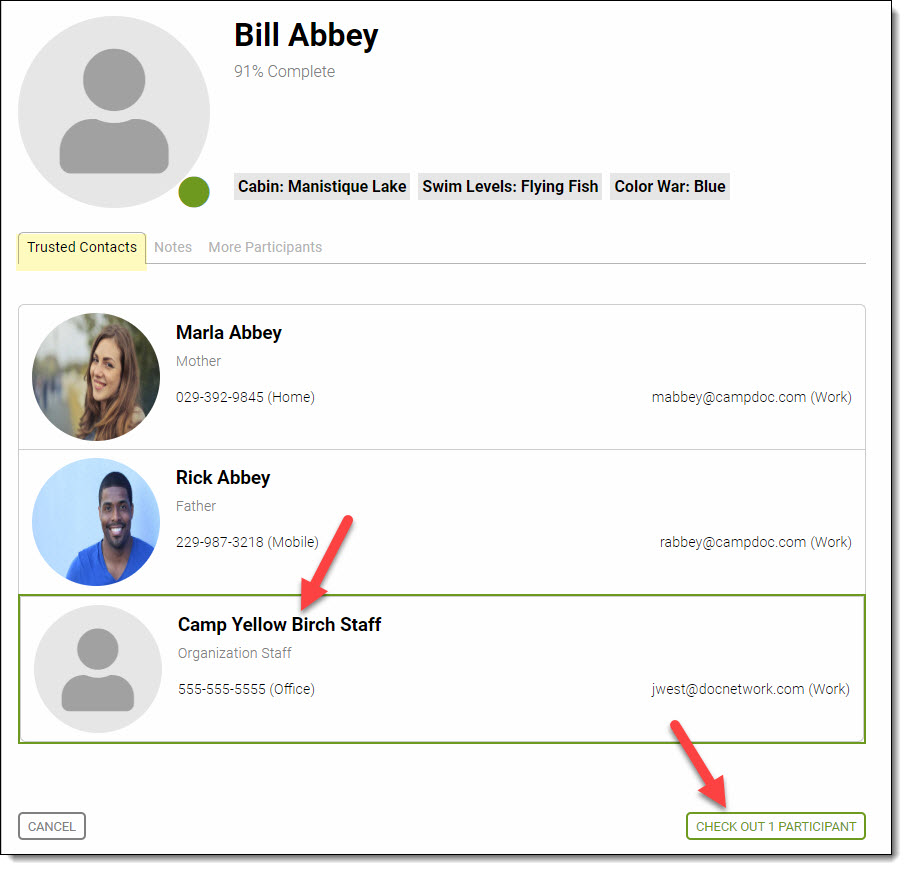
To check your participants in and out when Bypass Trusted Contacts is OFF:
- In the Check In/Out List, click the profile that you want to check in or out.
- Click the Trusted Contacts tab.
-
Click to select a Trusted Contact or the Universal Contact. When a contact is selected, it has a green border.
-
Click the Notes tab to see if there is a note from the previous check-in/check-out.
Important: The note from the most recent check-in/check-out will appear in the Notes tab. To see a list of all of a participant's notes from check-in/check-out, create a Standard Notes Report, and then select Attendance as the Notes Category. - (Optional) If you want to leave a note on a profile, click the Notes tab, type the message in the Note box, and then select a Priority level (i.e., Low, Normal, High.)
-
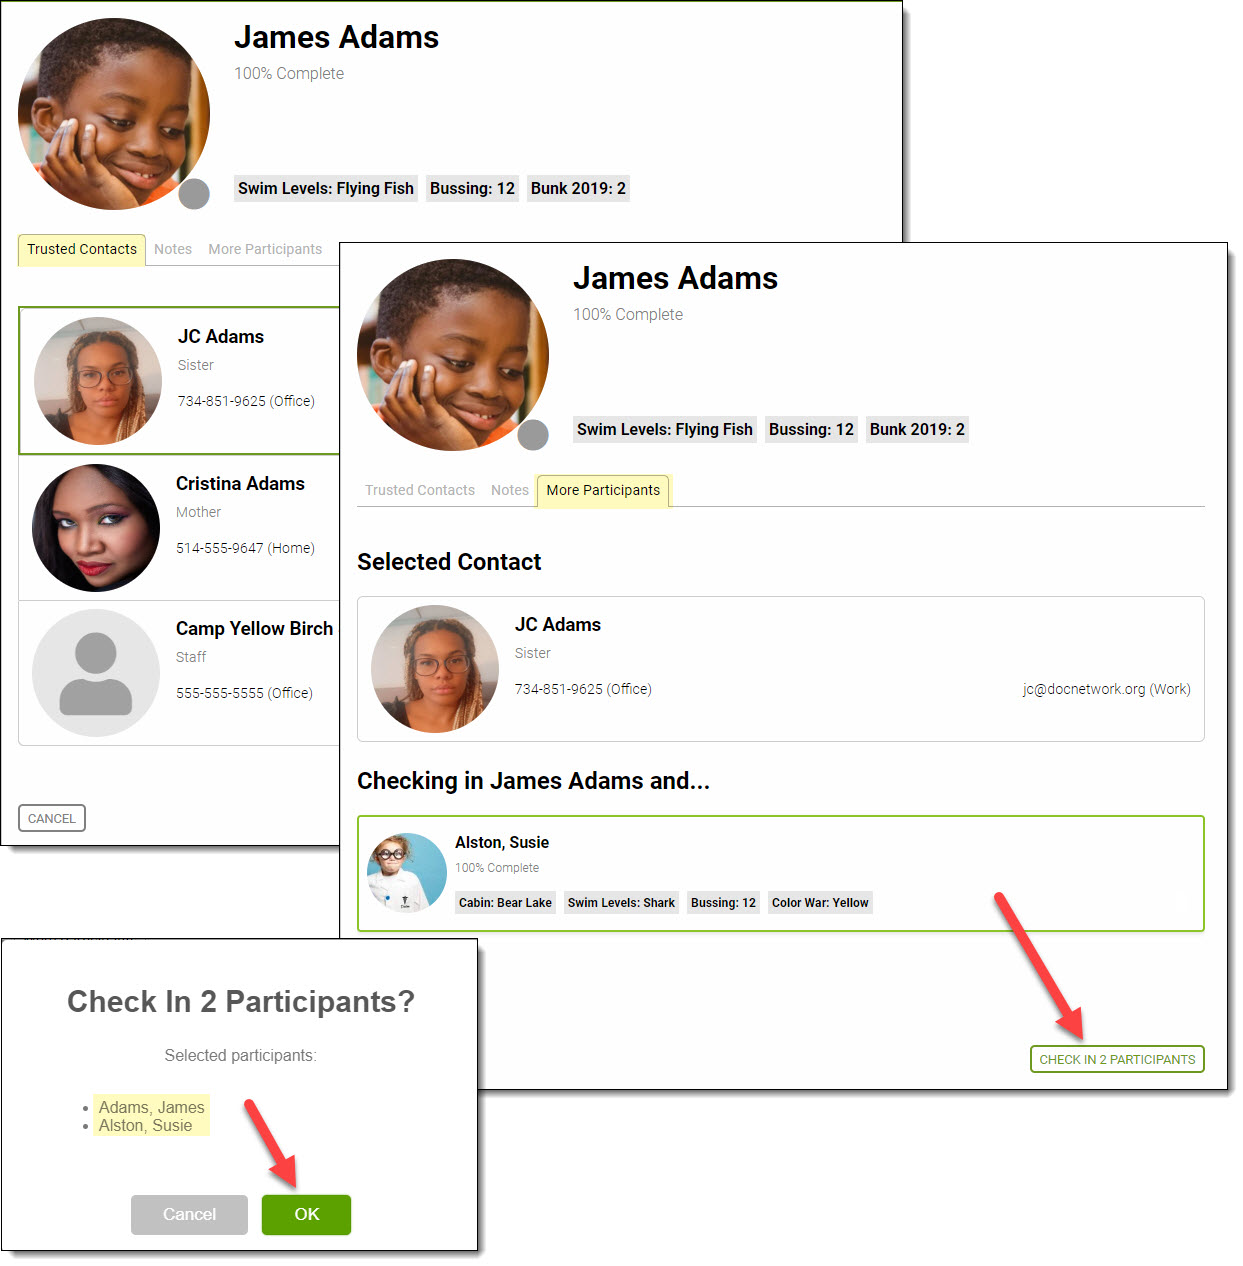
Do one of the following, depending on whether a trusted contact is checking one participant or several participants in or out:
- If a trusted contact is checking one participant in or out, click the CHECK IN/OUT 1 PARTICIPANT button, and then go to step 8.
-
If a trusted contact is checking several participants in or out, click the More Participants tab to see a list of participants the trusted contact is authorized to check in or out.
Important: The More Participants tab is not available for the Universal Contact. Enable Bypass Mode to check multiple participants in and out using the Universal Contact.
- Click to select the profiles you want to check in or out. When a profile is selected, it has a green border.
- Click the CHECK IN/OUT (# of selected profiles) PARTICIPANTS button.
- In the Confirmation window that appears, view a list of the participant(s) you are checking in or out, and then click the OK button. A Success window will appear.
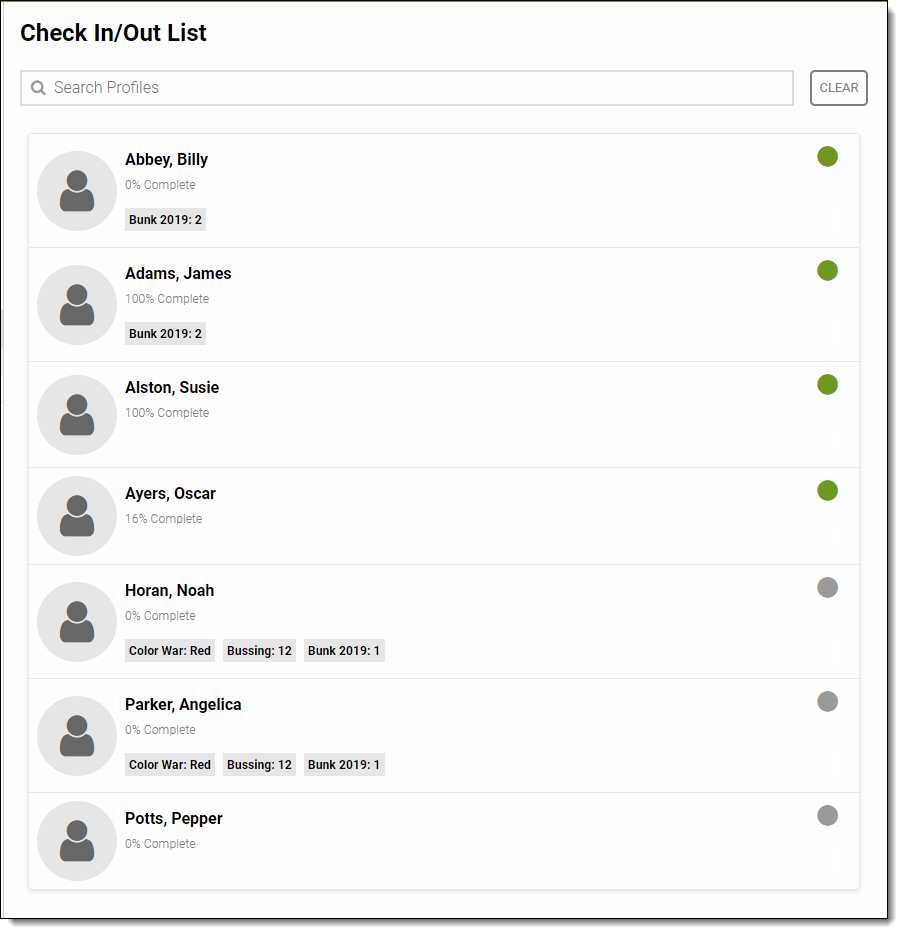
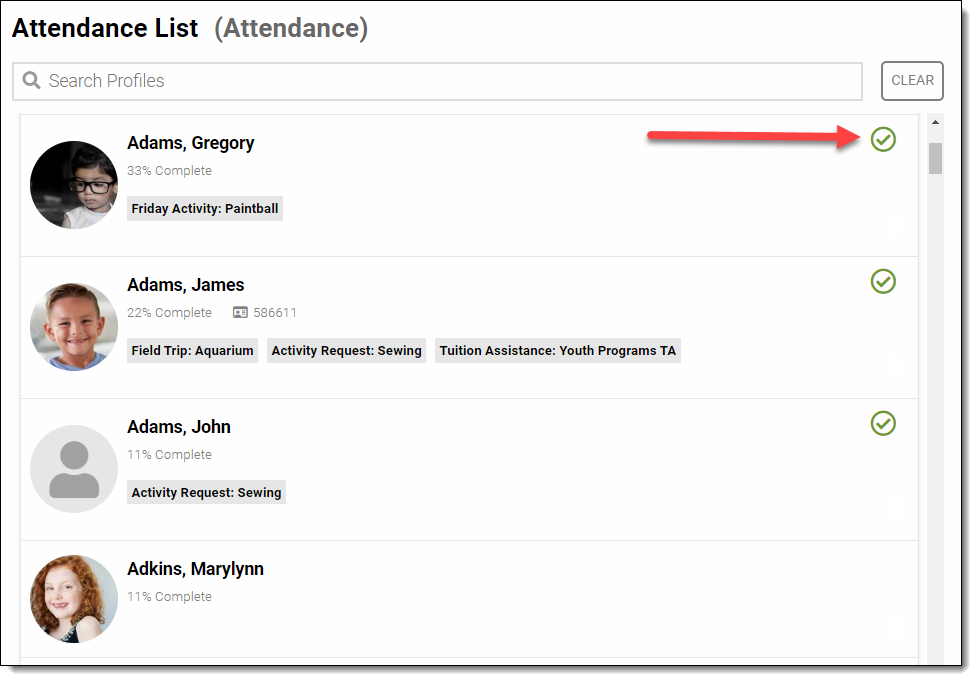
In the Check In/Out List, profiles that are checked in are signified with a green circle, and profiles that are not checked in are signified with a gray circle.
Bypass Mode
You can enable Bypass Mode in General Settings in order to quickly check multiple participants in or out at once, similar to the way that you take attendance. All Check In/Out records created in Bypass Mode use the Universal Contact.
To enable or disable Bypass Mode and check your participants in or out:
-
- In the Bypass Trusted Contacts section of your Check In/Out List, do one of the following, depending on whether you want to check your participants in or out:
- If you want to check your participants in, click the Check In button, and then go to step 2.
- If you want to check your participants out, click the Check Out button, and then go to step 2.
- If you want to disable Bypass Mode and check participants out individually, click the Off button
- In the Bypass Trusted Contacts section of your Check In/Out List, do one of the following, depending on whether you want to check your participants in or out:
- Click to select each of the participants you want to check in or out. When a profile is selected, it has a green border.
- After you have selected the participants that you want, click the CHECK IN/OUT # PARTICIPANTS button.
- In the window that appears, click the OK button to confirm the list of participants. A Check In/Out Success window will appear.

Attendance
After a participant is checked in, you can take attendance. Attendance records consist of the time of attendance, the name of the staff member taking attendance, and an optional Attendance Type. Please note that a participant must be registered to a current session in order to see them in a list and take attendance.
If you want to be able to take attendance for more than one activity, class, or session, you must set up Attendance Types in Settings. You also need the Attendance Taking Edit permission to take attendance for your participants.
In this section:
Create Attendance List
Before taking attendance, you can use the Attendance List Builder to create a custom Attendance List.
To create an Attendance List:
- In the Menu, click Attendance.
- In the submenu that appears, click Attendance.
-
(Optional) If you are using custom Attendance Types, click the Attendance Type box, and then select the appropriate type. Otherwise, the Attendance Type will default to “Attendance” in reports.
Important: If you want to be able to take attendance for more than one activity, class, or session, you must set up Attendance Types in Settings. - In the Attendance List Builder, add a condition or multiple conditions to create your Attendance List.
- Click the VIEW PARTICIPANT LIST button.
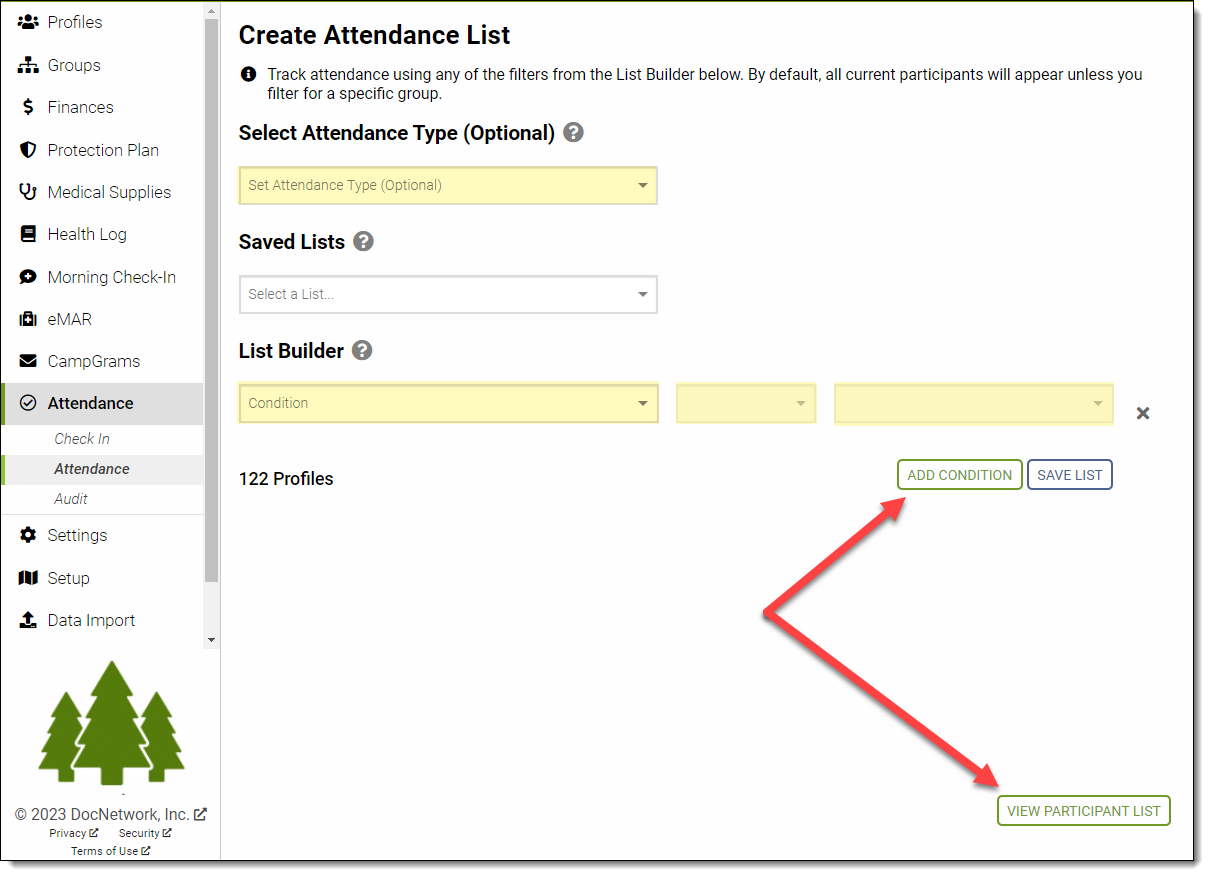
Time Saving Tip! You can click the SAVE LIST button to save an Attendance List or overwrite an existing one so you do not have to recreate the same lists over and over. You can also share your lists with others in your organization. Your saved lists can be found in the Saved Lists box toward the upper-left corner of the page.
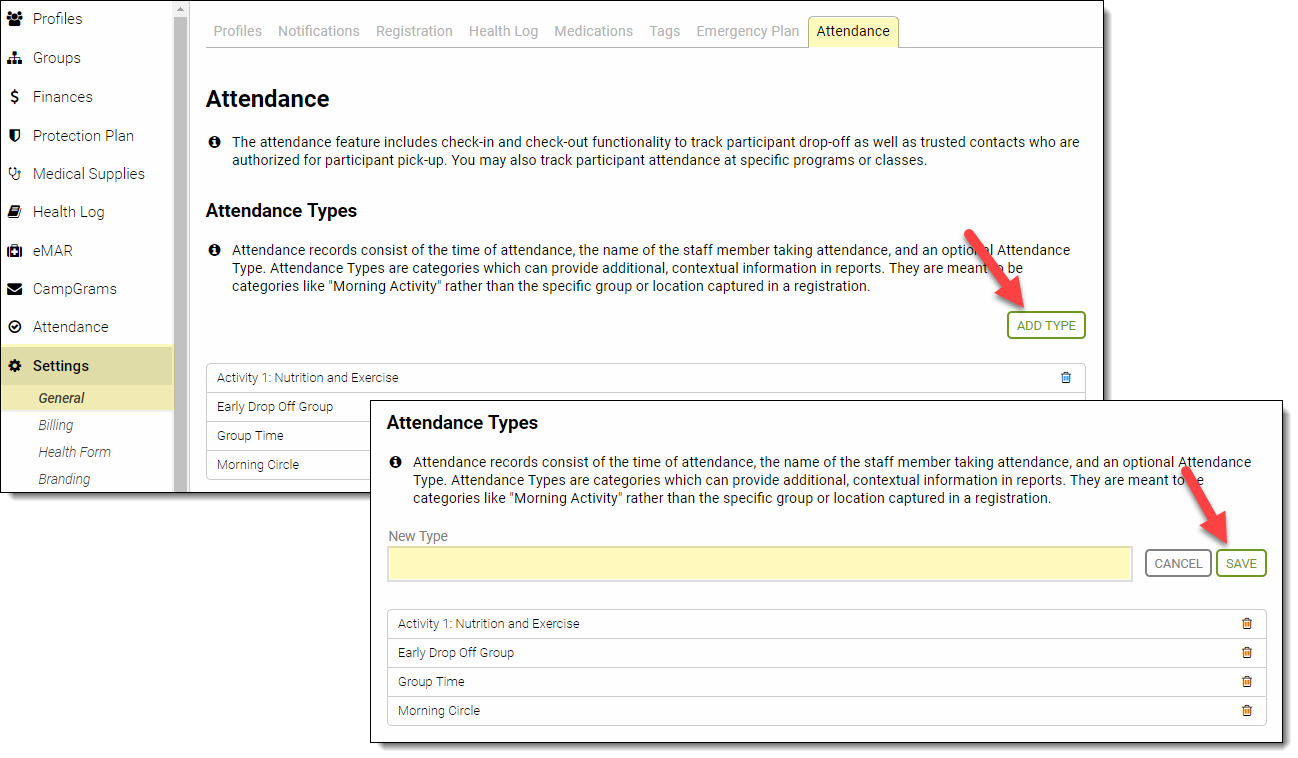
Attendance Types
Attendance Types are used to designate the activities, sessions, and classes for which you take attendance. They serve as categories to provide additional, contextual information in reports. You can add and delete attendance types in General Settings. It is important to note that you must set up Attendance Types if you want to take attendance for more than one activity, session, or class. You must have the Edit Permission for Attendance to edit Attendance Types.
To add Attendance Types:
- In the Menu, click Settings.
- In the submenu that appears, click General.
- In the right column, click the Attendance tab.
- Do one of the following, depending on whether you want to add or delete an Attendance Type:
- To add an Attendance Type, click the ADD TYPE button, and then go to Step 5.
-
To delete an Attendance Type, click the Delete icon (
 ).
).
- In the New Type box, type the name of the activity, session, or class for which you want to take attendance.
- Click the SAVE button.
Take Attendance
Once you have your Attendance List ready, you can get started on taking attendance.
To take attendance:
- In the Attendance List, click to select the profile(s) for whom you want to take attendance.
- Click the MARK (#) PARTICIPANTS button.
- In the Confirmation window that appears, view a list of the participant(s) for whom you are taking attendance, and then click the OK button. A Success window will appear.
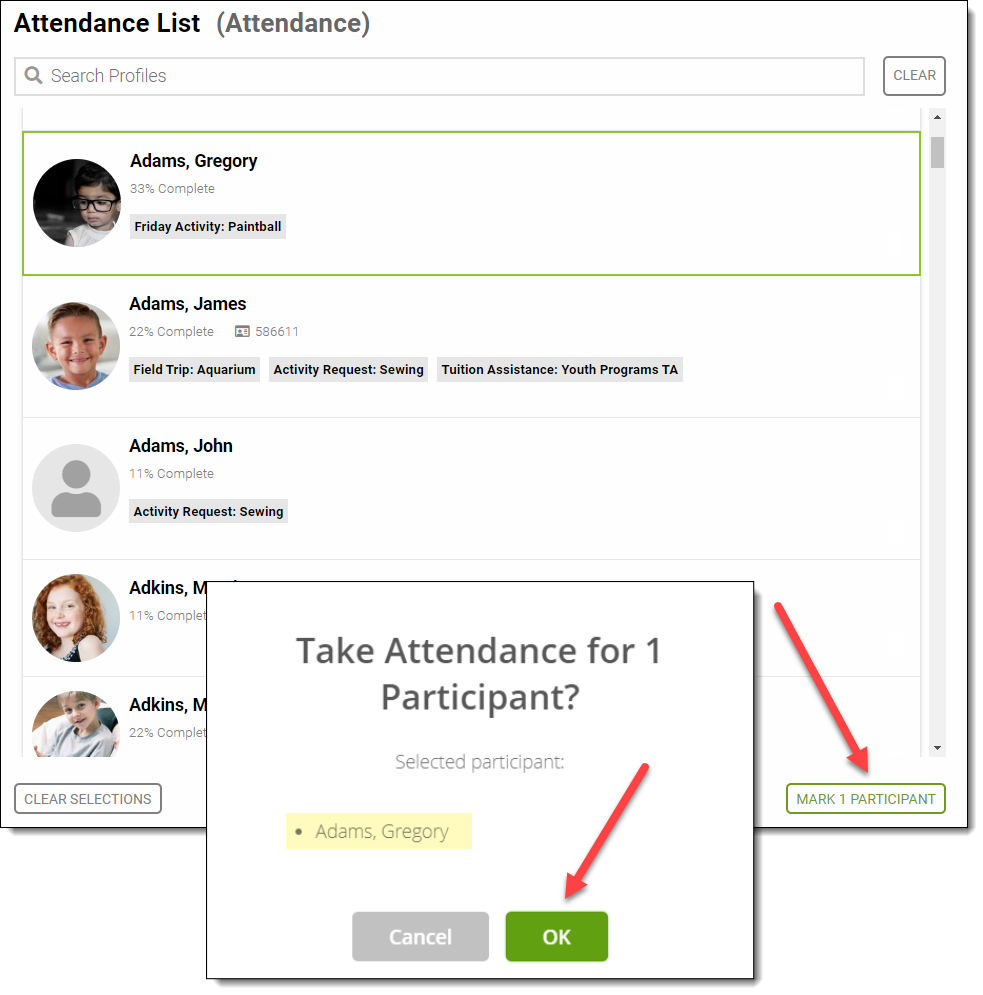
In the Attendance List, profiles marked in attendance are signified with a green check.
You can create a Standard Attendance Report to see Check-In / Check-Out and Attendance records. If you want to learn more about creating reports, check out our Reports article.
Audit
Unexpected circumstances like power outages or check-in issues may arise, and the Audit feature helps you keep your Check-In and Attendance records accurate.
You can use this feature to edit the times, dates, attendance types, notes, and providers in existing Check-In and Attendance Timelines, add new events to an existing Timelines, and delete Notes, Attendance events, and Check-In and Attendance Timelines.
It’s important to note that you cannot delete an individual Check-In event. This is considered the start of a complete Attendance Timeline. You can also create new Notes and Check-In and Attendance Timelines. You must have the Attendance Auditing permission in order to use this tool.
In this section:
Create Record Audit List
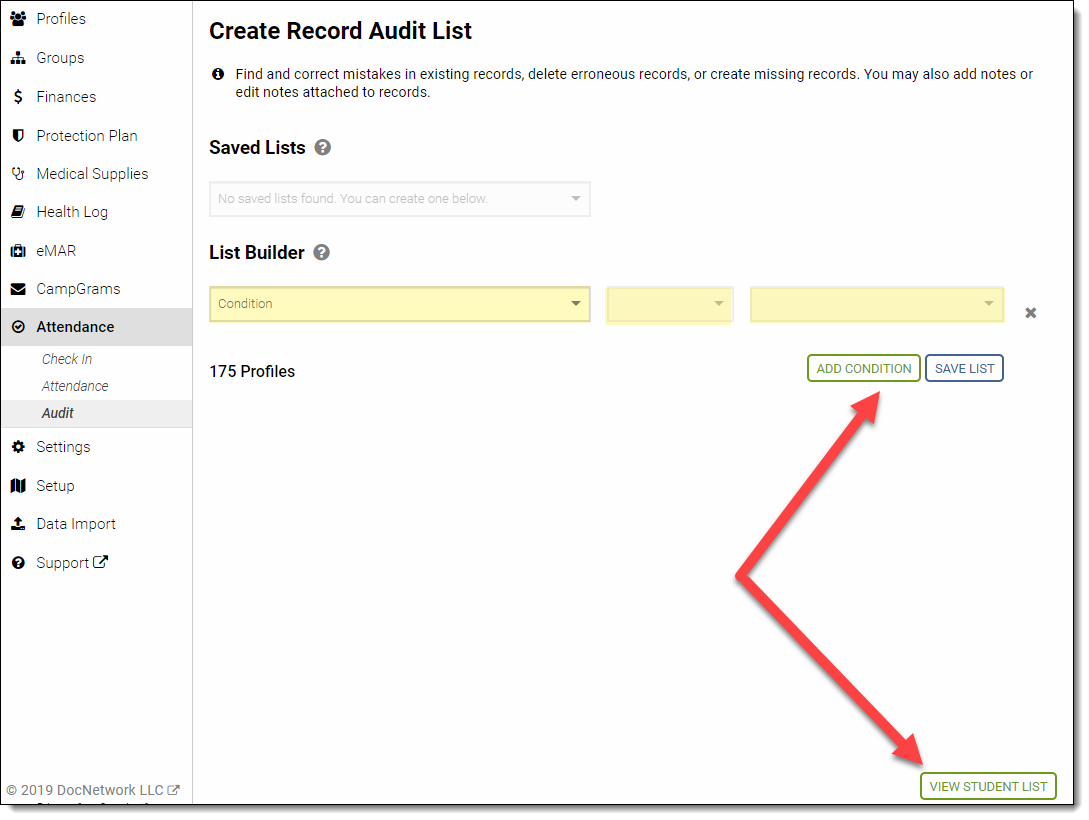
You can use the List Builder within the Audit feature to narrow down to a particular set of participants.
To create a record audit list:
- In the Menu, click Attendance.
- In the submenu that appears, click Audit.
- In the Audit List Builder, add a condition or multiple conditions to create your Record Audit List.
- Click the VIEW STUDENT LIST or VIEW PARTICIPANT LIST button.
Audit Events and Timelines
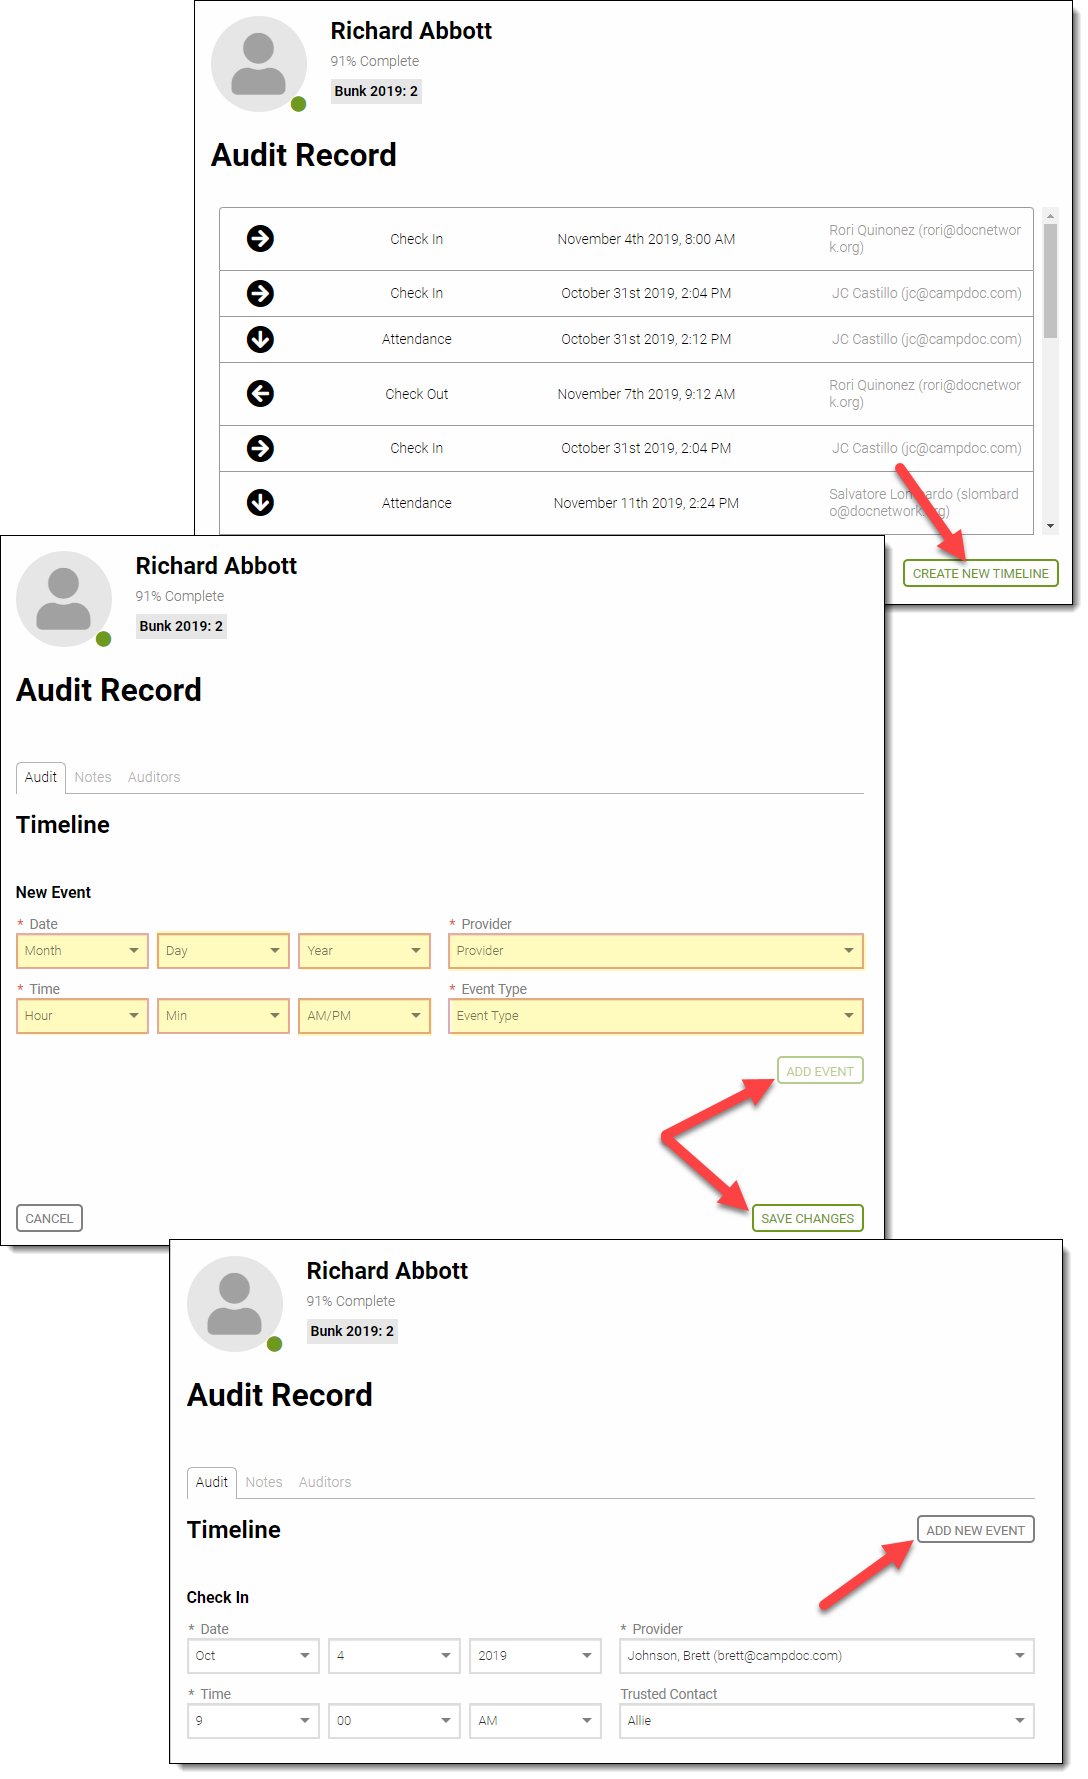
Once you create your record audit list, you can audit events and timelines. Specifically, you can edit or delete the times, dates, event types, and providers in existing Check-In and Attendance Timelines; add new events to existing Timelines; and create new Timelines.
In this section:
Add, Edit, and Delete Events and Timelines
To add, edit, and delete events and timelines:
- In the Record Audit List, click the participant whose records you want to audit.
- Click the event that you want to audit.
-
Do one of the following, depending on whether you want to add an event, edit an event, delete an event, or delete a timeline:
-
To add a new event, click the ADD NEW EVENT button, add the necessary information, and then click the ADD EVENT button.

- To edit an event, click to select each box that you want to edit, and then make the necessary changes.
-
To delete an event, click the DELETE EVENT button located below the event. The event will be removed immediately.
Important: If you click the DELETE EVENT button accidentally, immediately click the CANCEL button on the lower-left side of the page to cancel all changes you have made to an event. -
To delete an entire timeline of events, click the DELETE TIMELINE button, and then click the CONTINUE button in the confirmation window that appears.
Important: Deleting a timeline cannot be undone.
-
To add a new event, click the ADD NEW EVENT button, add the necessary information, and then click the ADD EVENT button.
- Click the SAVE CHANGES button.

Create New Timelines
To create a new Check-In and Attendance Timeline:
- In the Record Audit List, click the participant whose records you want to audit.
- On the lower-right side of the page, click the CREATE NEW TIMELINE button.
-
Add the information for the first event of a new record--Check-In.
Note: Check-In is the first event in any new Attendance record. - Click the ADD EVENT button to add the event to the timeline.
- Click the ADD NEW EVENT button to add any other events such as Attendance Types and Check-Out.
- Click the ADD EVENT button after you create each new event to save it to the timeline.
- Repeat Steps 5 and 6 until all events have been added.
- Click the SAVE CHANGES button.
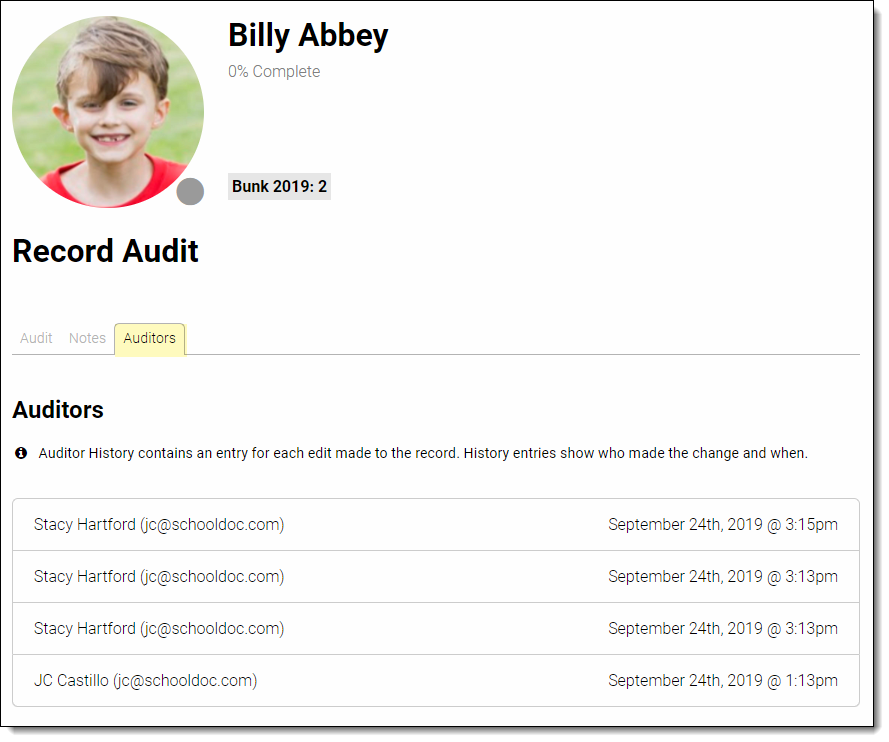
In any Attendance or Check-In event, click the Auditors tab to see the name, date, and timestamps for all auditors of a record:
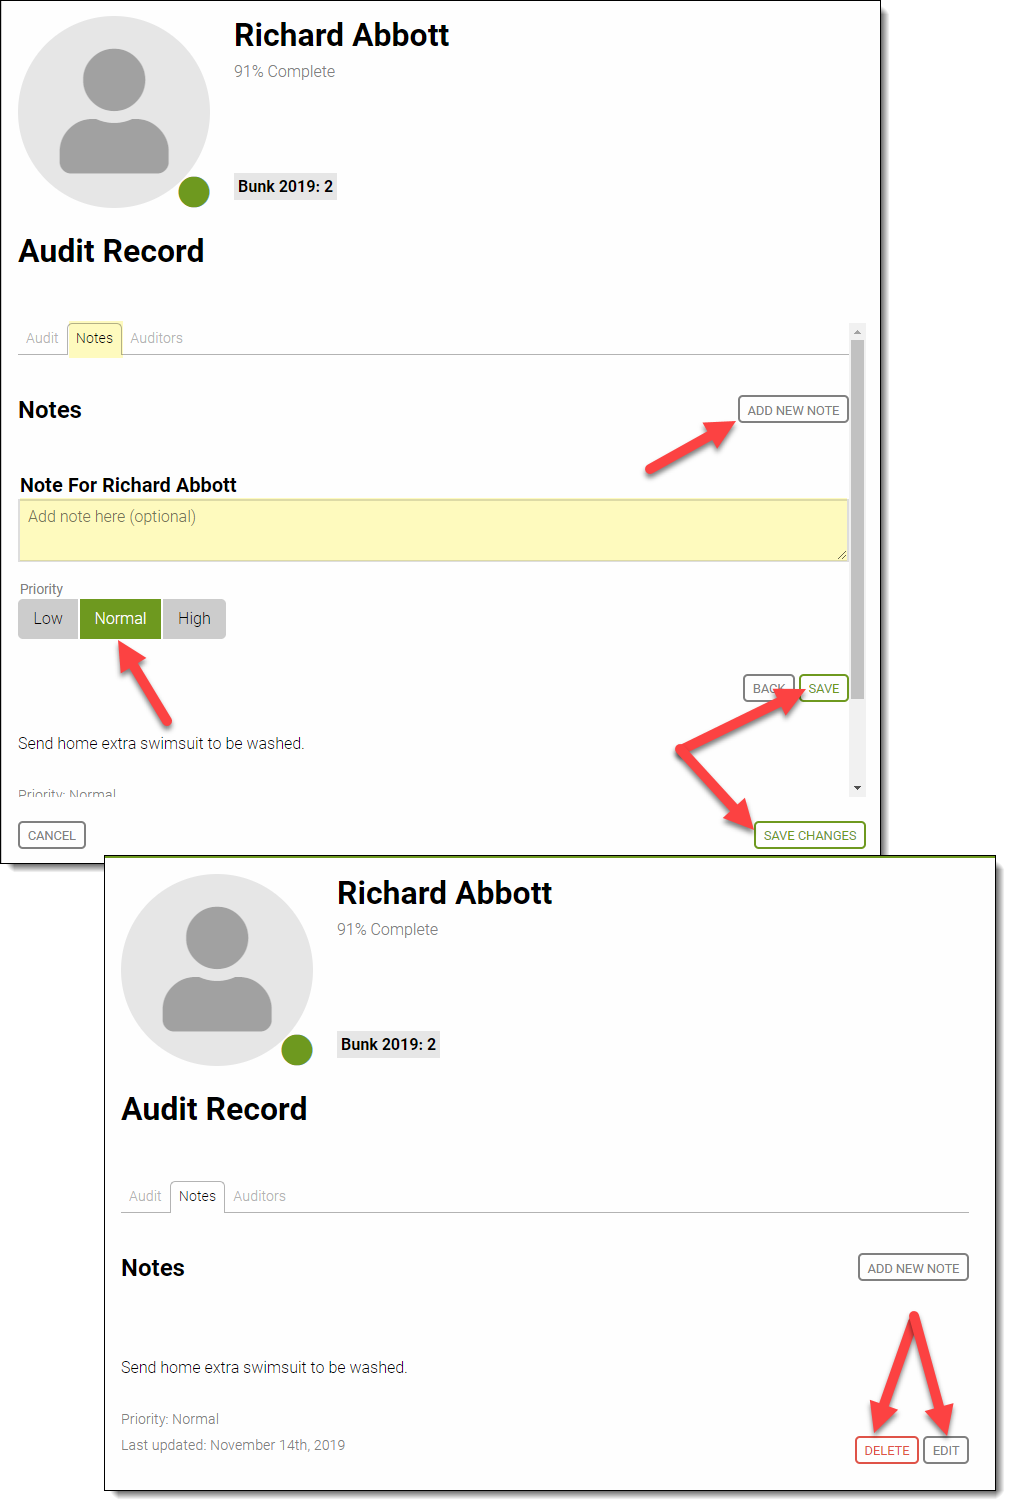
Attendance Notes
Attendance notes allow you to add a particular note to an individuals attendance profile. Notes allow information to be shared relevant to that particular participant.
To add, edit, or delete an Attendance note:
- In the Record Audit List, click the participant whose records you want to audit.
- Click the event that you want to audit.
- Click the Notes tab.
-
Do one of the following, depending on whether you want to add, edit, or delete an Attendance note:
- To add an Attendance note, click the ADD NEW NOTE button, and in the Note box, type your note.
- To edit an Attendance note, click the EDIT button, and then make any necessary changes.
-
To delete an Attendance note, click the DELETE button.
Important: If you click the DELETE button accidentally, immediately click the CANCEL button on the lower-left side of the page to cancel the removal of the Attendance note.
- Click the SAVE button, and then click the SAVE CHANGES button.