You can use the Organization - General, Registration, and Group Settings tabs to customize your account and ensure your software meets your program's unique goals. By adjusting these settings, you can manage participant profile visibility, streamline your registration workflow, and update critical session dates at your own pace. Use the following procedures to align your communication tools and maintain accurate records across all of your organizations.
In this article:
NOTE: You must have Primary, Admin, or proper provider permission to edit these settings. If you have a different role, you must be granted View or Edit access to the Organization Settings tab.
Organization - General Settings
00:03:
00:07: Hi, I'm Phil from the Doc Network Training Team.
00:09: And in this video,
00:11: we're going to focus on organization settings, specifically on general settings as
00:15: well as registration settings.
00:17: Be sure to check out our separate video for organization group settings, which
00:22: includes the ability to update things like contacts, dates, and notifications for
00:27: sessions.
00:28: These settings help you shape how your participants interact with your organization,
00:33: how communication works,
00:34: and how registration flows from start to finish.
00:38: Think of this as your control center for aligning CampDoc or SchoolDoc with your
00:42: program's goals.
00:43: Just a quick note before we start, you'll need primary, admin, or the proper
00:48: provider permissions to edit these settings.
00:50: Let's take a look.
00:51: To begin,
00:52: from your provider landing page,
00:54: head on over to Settings, General.
00:59: We'll start in Organization General Settings.
01:03: This area lets you customize how your organization appears,
01:06: how you communicate, and what participant information is collected.
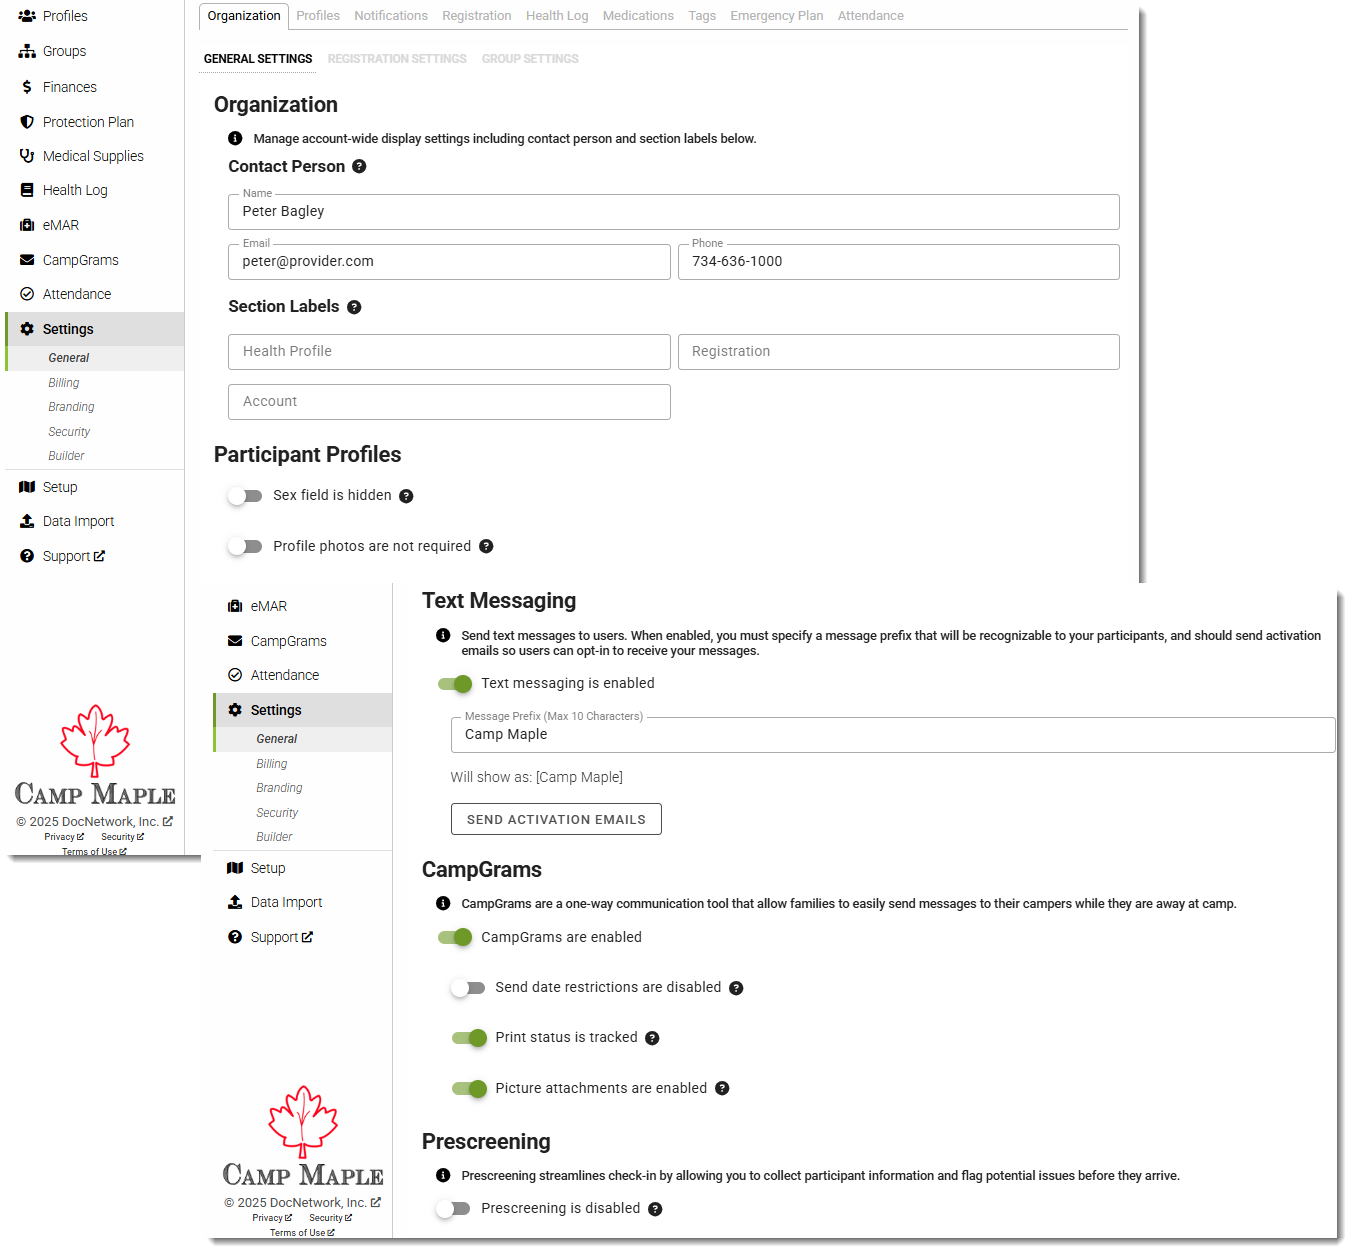
01:11: At the top, you'll see your organization information and contact person.
01:15: This includes the name,
01:17: email, and phone number used for communication with your organization.
01:21: Users will see this information as well,
01:24: so it's important to keep it accurate and up to date.
01:28: Next are section labels.
01:30: This is where you can rename sections of the participant profile to match your
01:34: organization's language.
01:36: For example,
01:38: health profile
01:39: could be called forms, profile, or information packet, or whatever makes sense for
01:43: you and your organization.
01:46: Registration could be sessions or programs.
01:49: Account could be finances or balances.
01:53: This helps create a more familiar experience for your families as well as your staff
01:57: and volunteers.
01:58: The participant profiles area
02:01: controls visibility and requirements for profile information.
02:05: Here,
02:06: you can enable or disable the sex field in participant profiles.
02:11: Keep in mind, disabling this limits sex-based capacities and form rules.
02:17: You can
02:18: also require profile photos or leave them optional.
02:23: Text messaging allows you to send one-way SMS text messages to participants.
02:29: You can enable or disable texting,
02:32: set a message prefix that's up to 10 characters
02:35: so families know who messages are coming from.
02:37: And finally, within the text messaging area,
02:40: you can send activation emails to prompt users to opt into texting.
02:45: Activation emails can only be sent once every seven days,
02:49: and they're a best practice when turning texting on.
02:53: Campgrams allow families to send one-way messages to campers.
02:57: Here,
02:57: you can enable or disable Campgrams entirely,
03:01: remove send date restrictions,
03:04: control print status visibility,
03:06: and allow picture attachments.
03:09: These options give you flexibility while still managing expectations for families
03:14: and giving them the peace of mind
03:16: of being able to send messages to their child while they're away at your program.
03:20: And finally, there's pre-screening.
03:22: When enabled, participants complete pre-screening questions before arrival.
03:27: This helps streamline check-in and flag potential issues ahead of time.
03:31: You can turn this on or off depending on your program's needs.
03:34: Next, let's move on to organization registration settings.
03:39: These settings shape how participants sign up, acknowledge terms, and pay.
03:44: When
03:46: we head to registration settings,
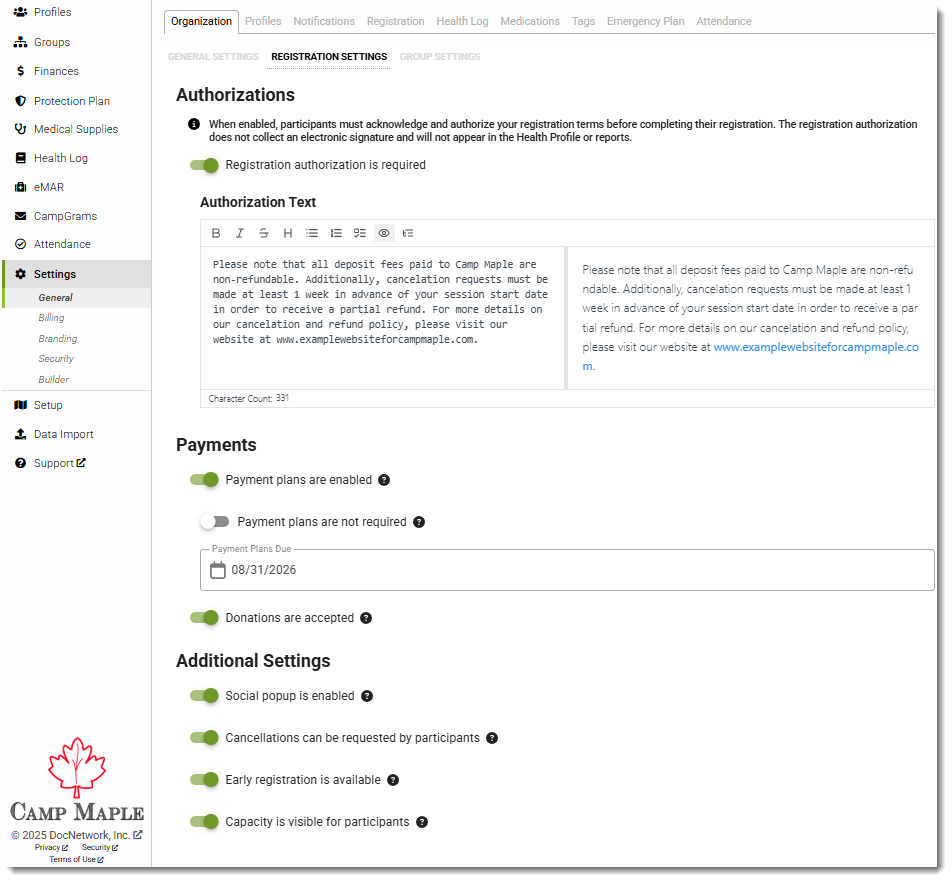
03:49: The first thing we see at the top is the Authorization section.
03:53: This allows you to require participants to acknowledge specific terms before
03:57: completing registration.
04:00: You can enable or disable the authorization requirement and customize the
04:04: authorization text
04:05: using a rich text editor.
04:07: It's worth noting that this acknowledgement is informational only.
04:11: It does not collect a legal signature and does not appear in reports.
04:15: If that's something you need, you'll want to make sure that's included in your
04:18: forms.
04:19: Talk to your Camp Doc or School Doc team for more information.
04:23: Under payments, you control flexibility during registration.
04:27: You can enable or disable payment plans,
04:30: make payment plans required or optional,
04:33: and set a due date for remaining balances.
04:37: You can also enable donations, allowing families to give to your organization during
04:41: the registration process.
04:43: The
04:44: additional settings section includes several optional features.
04:48: Social pop-up encourages sharing registration on social media.
04:52: Participant
04:53: cancellations allow participants to submit cancellation requests online.
04:58: Early registration requires a code to access registration for certain or all
05:03: sessions.
05:05: And capacity visibility
05:07: lets participants see remaining session availability.
05:11: These tools help you fine tune the experience
05:13: based on how much transparency and control
05:16: you want to provide.
05:17: And that's a full overview of organization general settings and organization
05:22: registration settings.
05:24: Taking a few minutes now to review these settings will save you time later, reduce
05:29: family confusion, and ensure your registration runs smoothly using the features that
05:34: best fit your needs.
05:35: Thanks for watching, and as always, don't hesitate to reach out if you have any
05:39: questions.
05:43: The video covers setting organization details, customizing participant profiles,
05:47: enabling communication options, and managing registration authorizations and
05:52: payments for a smooth participant experience.
Use the General Settings tab to tailor your account to your program's needs. This section allows you to:
-
Align communication: Update and edit organizational contact person, enable CampGrams, follow-up settings, and SMS for activations to maintain consistent workflows.
-
Manage profile essentials: Configure profile photo requirements and the display of sex (assigned at birth) information to keep records accurate.
-
Prioritize health and safety: Use Prescreening and Prescreening Reminders to ensure health checks happen before arrival.
Organization
The Organization section includes high-level details that appear throughout your account.
Contact Person
You can update the primary contact information for your organization:
This information is used for system communications and is visible to participants where applicable.
Section Labels
Providers can rename various terms that appear in the participant profile to match your organization's terminology. The sections of the participant profile that can be customized are:
-
Health Profile - e.g., Forms, Application, Information Packet, etc.
-
Registration - e.g., Sessions, Programs, etc.
-
Account - e.g., Finances, Balances, etc.
Participant Profiles
This area lets you control visibility and requirements for participant information.
Sex Field Visibility
- Enable = Sex field is included in the participant's profile (On by default)
- Disable = Sex field is not included in the participant's profile.
- NOTE - If the sex field is disabled, this will limit an organization's ability to use sex-based capacities, sex-based subgroup restrictions in the profile forms.
Profile Photos
- Enable if profile photos are required.
- Disable to not require profile photos. (Off by default)
Text Messaging
Providers can enable one-way text messaging to participants.
Enable / Disable Text Messaging
- Turn messaging on to communicate via SMS/text message.
Message Prefix
- Set the prefix that appears at the beginning of text messages.
- Up to 10 characters.
- Helps participants recognize who the messages are from.
- The preview field shows how your messages will display.
Send Activation Emails
After enabling text messaging, you can send Activation Emails to prompt users to opt in. We recommend this as a best practice to make sure all participants have the opportunity to confirm their phone numbers.
NOTE: You can send Activation Emails only once every seven days.
CampGrams
CampGrams are a one-way communication tool allowing families to send messages to campers.
CampGrams Controls
-
Enable / Disable CampGrams
-
Disable Send Date Restrictions - Removes the limitation that prevents the sender from selecting a delivery date beyond the participant's current session.
-
Enable Print Status Tracking - Controls transparency for the sender. When disabled, this hides from users whether a message was printed by your staff.
-
Enable Picture Attachments - Allows families to include a photo with their message.
Prescreening
The Prescreening feature helps streamline check-in by collecting information and flagging issues before arrival.
- Enable or disable depending on whether your program wishes to include prescreening questions.
When enabled, participants complete prescreening forms prior to check-in.
[Return to Top]
Organization - Registration Settings
You can use the Registration Settings tools to control how participants sign up for your programs. This helps you create a process that matches your organization’s specific goals.
Use this section to do the following:
- Set up a Registration Authorization.
- Manage payment plans for families.
- Accept donations during the sign-up process.
These settings help you make sure that the process is clear for participants. It also gives you the flexibility to manage your workflow exactly how you need to.
Authorizations
Providers can require participants to acknowledge specific terms before finishing their registration.
Registration Authorization Requirement
-
Enable this setting to require participants to accept a registration authorization before completing their registration. Disable to remove this mandatory step.
Authorization Text
- Add or edit the terms participants must read and acknowledge.
- Includes a rich-text editor for formatting.
- Displays a character count as you type.
- Please be aware that this acknowledgment is informational only and does not collect a legal signature or appear in reports.
Payments
This section allows you to control payment flexibility and donation options during registration.
Payment Plans
- Enable or disable payment plans.
- Choose whether payment plans are required or optional.
- Set a Payment Plans Due date to define when the remaining balance must be paid.
Donations
- Enable to allow participants to include an optional donation during registration.
Additional Settings
These features let you customize extra elements of the registration experience.
Social Popup
- Enable a pop-up encouraging participants to share their registration on social media.
Participant Cancellations
- Allow participants to submit cancellation requests directly through their account.
Early Registration
- Turn on early registration to require participants enter a code in order to access registration for certain or all sessions.
Capacity Visibility
- Make session capacity visible so participants can see remaining availability.
Group Settings
Use Group Settings to keep your program information up to date. You can adjust session dates and manage notifications to ensure your account matches your current program needs.
Using Group Settings, you can access these settings in the Organization tab (Settings > Organization). From this page, you can do the following :
-
Update dates: Change session start dates, end dates, profile due dates, and lockout dates.
-
Manage notifications: Set preferences for reminders, registration updates, and profile completions.
-
Edit contact info: Add or update contact information for specific groups.
Group Settings allows you to manage group-level details in your account, helping you keep your information up to date as your program evolves.
Why this matters
You can adjust session dates, enable notifications, and manage other setup details directly, giving you more control and flexibility to keep your account up to date at your own pace.
00:06: Hi there. I'm Phil from the doc Network training team.
00:10: In this video, we're going to show you our new group settings, feature in Camp, Dock,
00:14: and school. Doc, giving you the ability to make quick updates to your program
00:18: details without waiting on us previously making small updates
00:22: like adjusting session dates or certain notifications required reaching
00:26: out to our team, but that's no longer the case with group settings.
00:30: You now have Direct Control to manage your account setup at your own pace,
00:34: helping you keep your information up to date as your program evolves.
00:38: In this video, we're going to show you how to Update group level details
00:42: like sessions start and end dates.
00:45: Profiled due dates and lockout dates.
00:48: Customize notifications, settings for specific groups, add
00:52: or update contact information for specific groups.
00:55: These tools will help your team.
00:57: Keep your information current reduce turnaround time for updates and
01:01: help you maintain.
01:03: Controlled during your season and beyond in order to access your group
01:07: settings, you'll first need to make sure you have the proper permissions and roll
01:11: for your account. If you don't and you suspect, you need those permissions.
01:15: Reach out to your organization's.
01:17: Primary Camp, doc or School dot contact.
01:19: Assuming you have the proper permissions enroll.
01:22: First, log into your Camp, Docker School, doc provider account.
01:27: Navigate to settings General in the menu on the left hand side.
01:32: Immediately, you'll see the group settings tab up at the top.
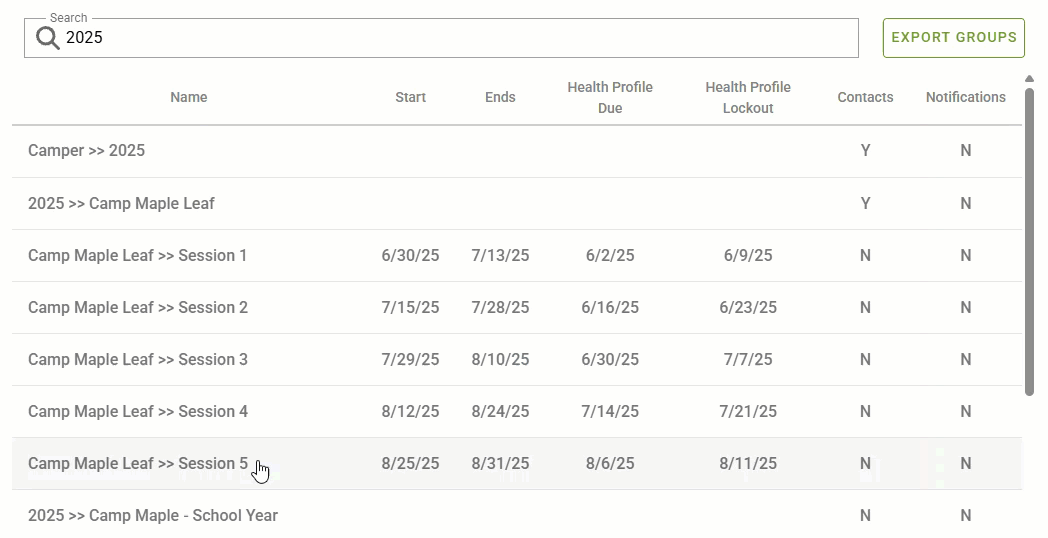
01:36: Listed below, you'll see the entirety of your organization's groups that
01:40: are currently in your platform. You can see the dates and any
01:44: subgroup contacts and subgroup notifications will be indicated by
01:48: a why you can simply scroll through all of your sessions or if it's
01:52: easier, perhaps you have a large number of sessions, you can utilize the
01:56: search to narrow your scope. If you want to see your entire group
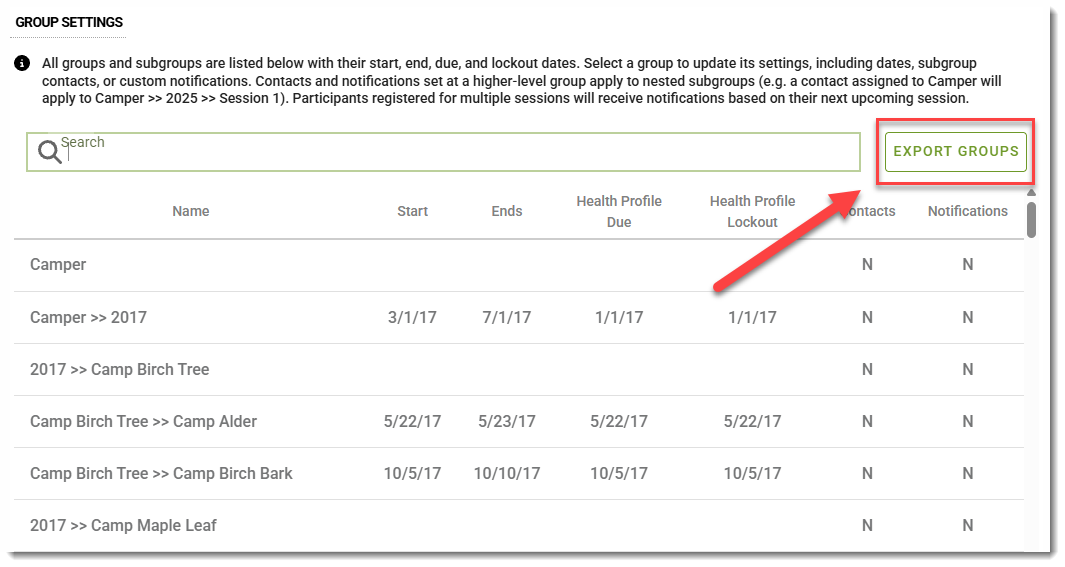
02:00: list, you can simply click on.
02:03: The export groups button in the top right to export a list of all your past
02:07: current and upcoming sessions, including dates,
02:11: subgroup contacts and registration details.
02:14: Assuming you're using our registration platform, This
02:18: allows you to get a full picture of your groups or even just for preparing a submission
02:22: spreadsheet for the next season. In this example, let's
02:27: look for the 2025 groups. This automatically will bring
02:31: up any and all groups that are under our 2025 groups.
02:37: Now, where we go from here. Depends on what we're trying to do.
02:40: Let's say, I just needed to adjust some dates for a particular session.
02:45: Simply click on that session and adjust the dates as needed.
02:51: Click save and you're all set. Now let's say, for example, I
02:55: have a team member who oversees all of our camp Maple Leaf sessions but
02:59: that's it. Nothing more. Nothing less.
03:03: Let's take a look at Camp Maple Leaf at the highest level.
03:05: When I hover over it I can see Camp.
03:08: Maple Leaf is at the L3. The level 3 group.
03:12: So it doesn't have dates listed. Similar to when registering a
03:16: provider to a higher level group, you can add a contact or notification
03:20: to a higher level Group, which will impact all of the groups that are nested within it.
03:25: In this case, adding a contact or notification will impact
03:29: all Camp Maple Leaf sessions. Let's go ahead and add in our
03:33: campmate belief contact information here.
03:40: And then we can adjust or customize any of our group notifications
03:44: here. As a reminder, group notifications are those
03:48: automated emails that are system generates as needed? Additionally,
03:53: I can do that at an individual session level, too.
03:57: Maybe I have different contact, people per session or
04:02: I need to adjust.
04:03: Dates for sessions. I can do that as well.
04:06: As a quick tip be aware that if you have a contact set at a higher level
04:10: such as can't Maple Leaf and then a different contact set at the
04:14: lower level. Can't Make Believe session 4.
04:16: For example, the lower contact will display for any participants
04:20: who are registered to that particular session.
04:24: It's worth pointing out that while the important dates and contact information Tabs are
04:28: pretty straightforward. There are a few things that you should know when it comes to
04:32: notifications. First off, keep in mind that notifications
04:37: set at a higher level group will apply to all nested groups
04:41: that do not have a custom sub-group notifications set.
04:46: If a subgroup notification is set, it will override the notification
04:50: setting at the higher level group. Finally, if a participant
04:54: is registered to multiple sessions, They will receive the notifications according
04:58: to the session with the earliest start date.
05:02: If you have,
05:03: About what notification does. What we have some great resources available
05:07: in our support site in our provider Pages, general settings,
05:11: notifications section, And
05:16: that's it. Group settings, gives you the flexibility to manage your programs
05:21: efficiently, helping you keep your information up to date, and offering you ways
05:25: to customize your settings by group, thank you for taking the time to watch.
05:29: And as always, if you have any questions about group settings, don't hesitate
05:33: to reach out.
[Return to Top]
How to access Group Settings
-
Log in to your CampDoc or SchoolDoc account.
- In the left-hand menu, navigate to: Settings → General.
- Click on the Organizations → Group Settings tab at the top of the page.
Viewing Your Groups
- You will see a list of all your organization’s groups currently in your platform.
-
Dates (Start, End, Health Profile Due, and Health Profile Lockout), Subgroup Contacts, and Subgroup Notifications will be indicated for each group.
- You can scroll through all sessions or use the Search bar to narrow your list, which is especially helpful if you have a large number of sessions.
- Utilizing the search functionality, you will see the last 2 levels listed - if you hover over the name, you will see the entire group structure order).
- To view your entire group list, click the Export Groups button in the top right. This exports a CSV spreadsheet of all past, current, and upcoming sessions, including dates, subgroup contacts, and registration details (if using the registration platform).
[Return to Top]
Updating Session Dates
To adjust dates for a session:
- Locate the desired session in your Group Settings list.
- Click on the Session Name.
-
Edit the start and end, Health Profile Due, or Lockout dates as needed.

- In the lower-right corner of the page, click the SAVE button.
[Return to Top]
Adding or Updating Contact Information
You can add or update contacts at either:
-
The group level (higher-level group):
For example, if you add a contact to a higher-level group like “Camp Maple Leaf,” the contact information will apply to all nested sessions under that group unless overridden at a lower level.
-
The individual session level (lower-level group):
If a session requires a different contact, add the specific contact directly to that session.
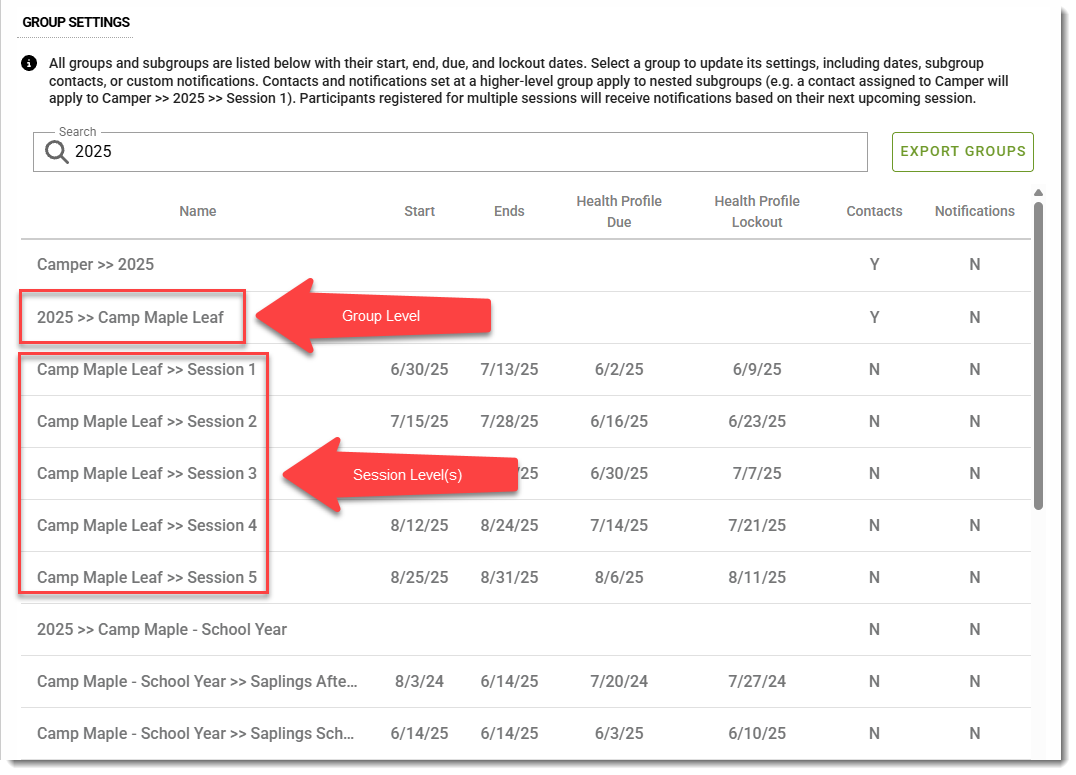
NOTE: If different contacts are set at the higher-level group and a nested session, the contact set at the lower-level session will display for participants registered to that session.
[Return to Top]
How to Add or Update Contact Information
- Log in to your CampDoc or SchoolDoc provider account.
- Navigate to: Settings → General → Organization → Group Settings
- Locate and click on the group or session you want to update.
- Go to the Contacts section.
- Add a new contact or update the existing contact information.
- Click Save to apply your changes.
[Return to Top]
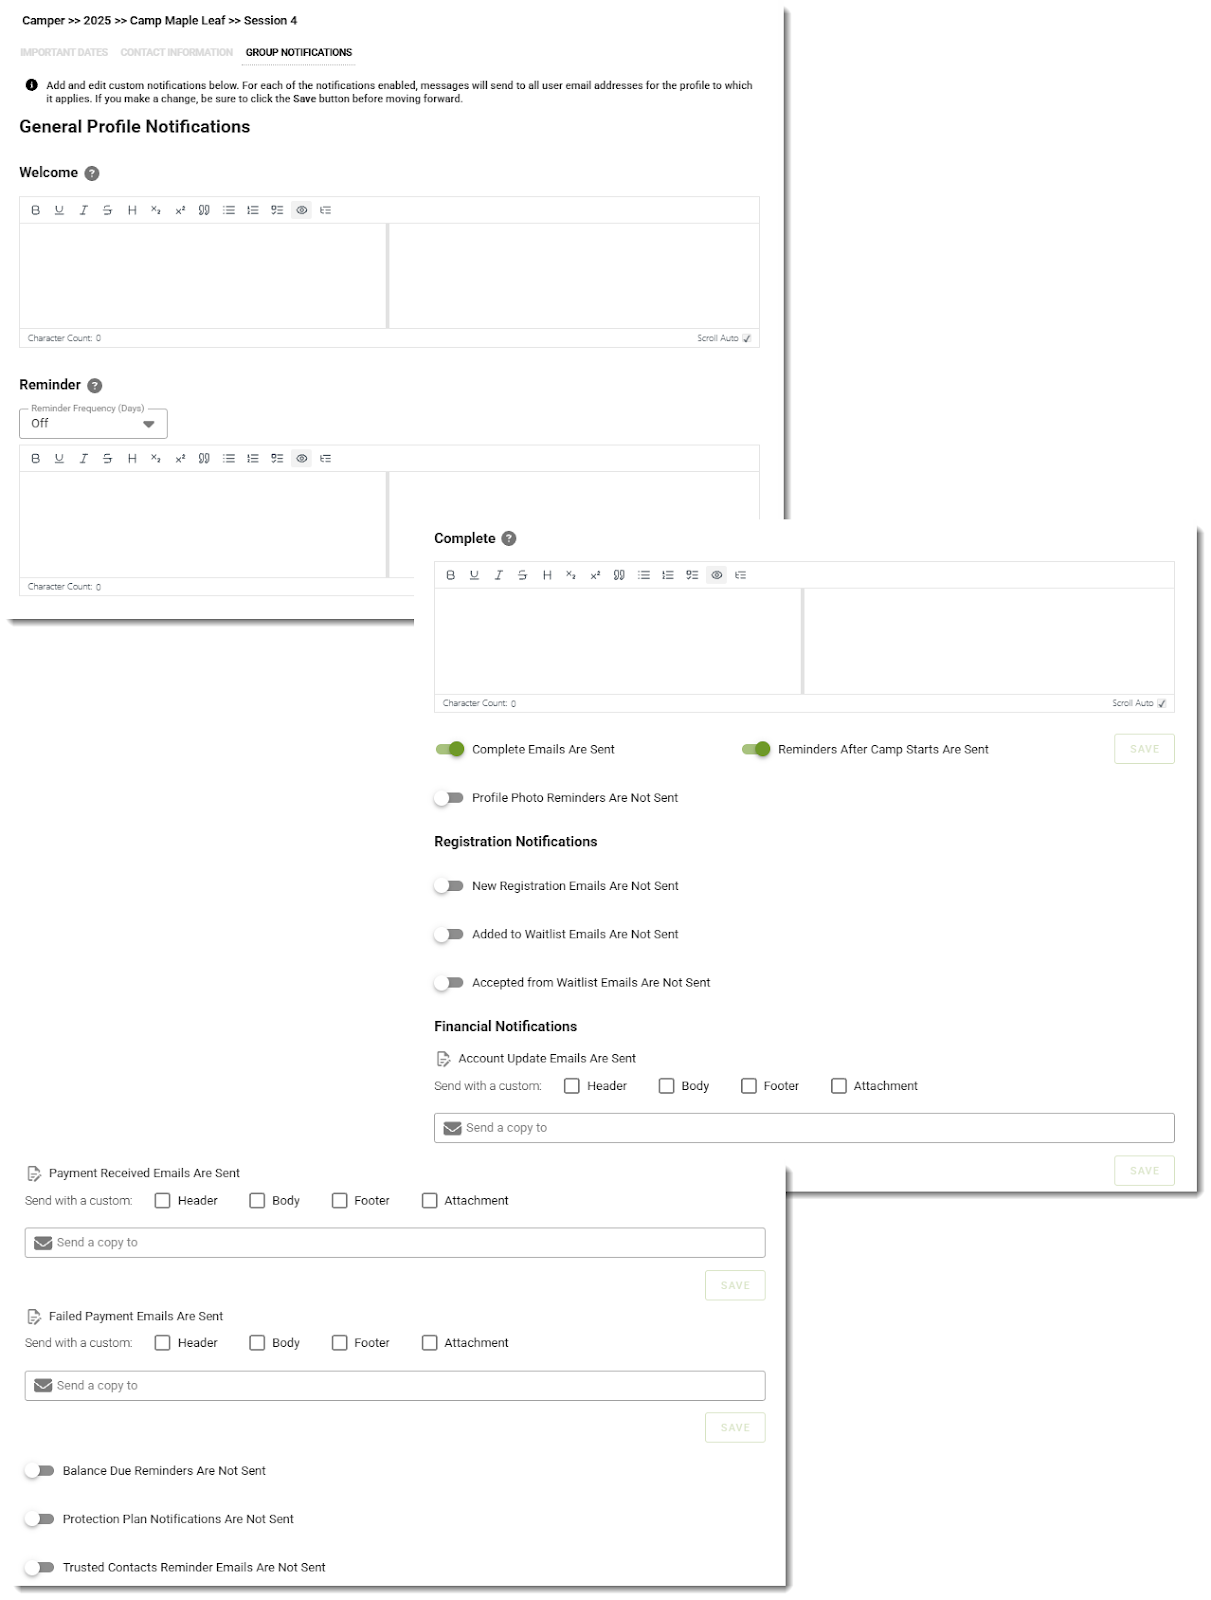
Customizing Notification Settings
Group Settings also allows you to adjust notification preferences for specific groups and sessions.
Key points to remember
- Notifications set at a higher-level group apply to all nested groups unless a custom notification is set at a lower level.
- If a custom notification is set at a subgroup (or lower level), it will override the higher-level group’s notification.
- If a participant is registered for multiple sessions, they will receive notifications according to the session with the earliest start date.
How to Update Notification Settings
- Go to: Settings → General → Organization → Group Settings
- Locate and click on the group or session where you want to adjust notification settings.
- Navigate to the Notifications section.
- Enable, disable, or adjust notification preferences and/or messaging based on your organization’s needs.
- Click Save to apply changes.
[Return to Top]