Welcome to the DocNetwork support guide on how to effectively use BugHerd. This document will provide a step-by-step walkthrough of how to download and install BugHerd on your device, along with instructions on how to document edits for health forms. Additionally, you may find our How to Use BugHerd in 6 Steps article to be a helpful resource.
00:03: Well Hi! I'm Phil from the DocNetwork training team. In this video
00:07: we're going to walk through BugHerd; our tool that helps our providers
simplify the 00:11: onboarding process, especially when it comes to updating
Health profile forms 00:15: and making edit requests. This video will walk
you through how 00:19: to download and install BugHerd on your computer.
In a separate video we'll also 00:23: walk through the steps to request an
edit to the forms. To 00:28: start the process off your team here at CampDoc
or SchoolDoc will send you 00:32: an invite to your organization's project
in BugHerd. Simply 00:36: accept the invite. You'll then be prompted to create
a 00:40: free account. Once you accept the invite you'll be asked to download
00:45: the Chrome extension. It's the extension that really gives BugHerd
00:49: It's magic. With that in mind we recommend using Google 00:53: Chrome
with BugHerd. It can be downloaded on Safari and Edge, but Chrome 00:57:
is our preferred browser. After creating an account and accepting 01:01:
our invite a new page will direct you to the Google Chrome Store to 01:05:
download BugHerd. Simply click to install and that will direct 01:09: you
to the BugHerd download. And then click 01:13: the add to Chrome button in
the top right corner of the page. When 01:17: prompted click ADD extension
button to complete the installation. 01:23: There is a short video available
that you can watch and this will show you some of the features of BugHerd.
01:28: then to get started click go to your organization. As 01:32: a quick
side note, it's come to our attention that due to some updates within 01:36:
BugHerd that your landing page may look similar, but a little 01:40: different
than what you see here. It may say projects or 01:44: websites or something
comparable depending on updates 01:48: to BugHerd or your extension. Once
you 01:52: click go to your organization BugHerd will open. And this part's
01:56: important as often times people can mistakenly log in with their regular
provider account. 02:01: You need to log into CampDoc or SchoolDoc using
the test account 02:05: credentials provided by your team and not your provider
email. 02:09: Make sure to see your test account credentials in the email
that the CampDoc 02:13: or SchoolDoc team sends over. You should now have
access to your test account 02:17: and a BugHerd sidebar. If you click the
navy BugHerd button 02:21: in the bottom right corner of the page, it will
open the sidebar as well. At 02:26: this point, you have BugHerd all set
up and you'll be able to use this as your great new tool 02:31: for updating
your CampDoc or SchoolDoc account. To find 02:35: out how to actually request
edits, make sure to watch part 2 of this video 02:39: series. Thanks for
watching, and as always don't hesitate to reach out if 02:43: you have any
questions.
-
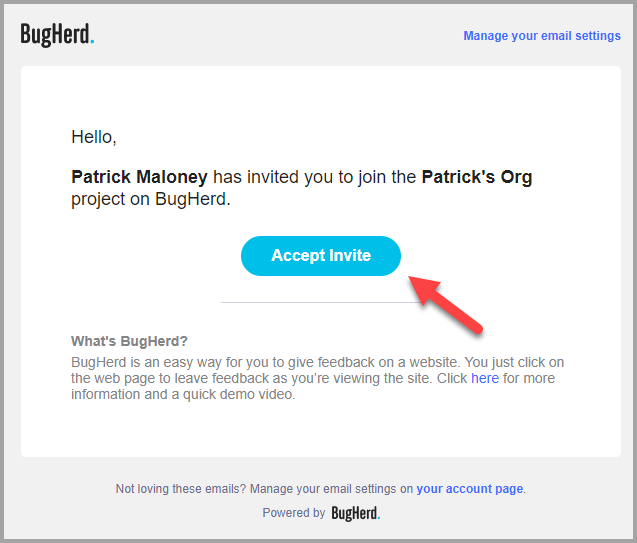
Your Client Success team will send you an invitation to join your Camp/School
project.
- Accept the invite.
- You'll be prompted to create a free account.
[Return to Top]
Downloading and Installing BugHerd
We recommend using Google Chrome for the best BugHerd experience, although
it can also be downloaded on Safari and Edge.
Follow the steps below to download and install BugHerd:
-
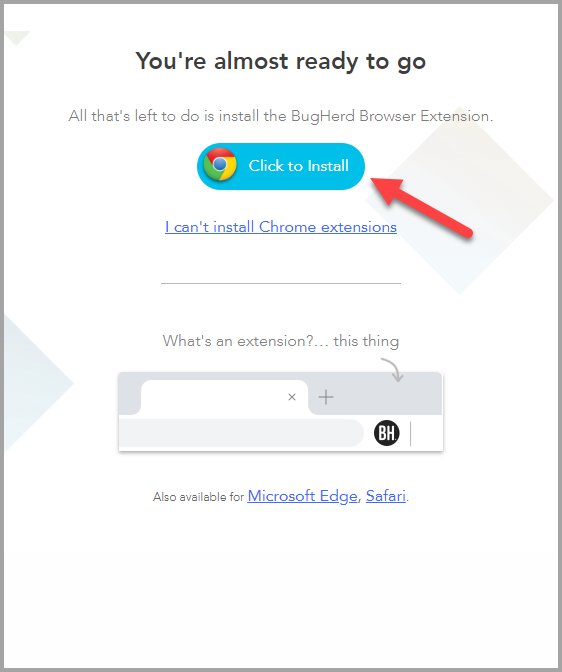
After accepting the invite, you'll be directed to the Google Chrome Store
to download BugHerd.
- Click "Click to install" to initiate the BugHerd download.
- Click the "Add to Chrome" button in the top-right corner.
-
When prompted, click "Add extension" to complete the installation.
- To get started, click "Go to your organizations."
[Return to Top]
Using BugHerd Dashboard
Follow the steps below to use the BugHerd dashboard and access your test
accounts:
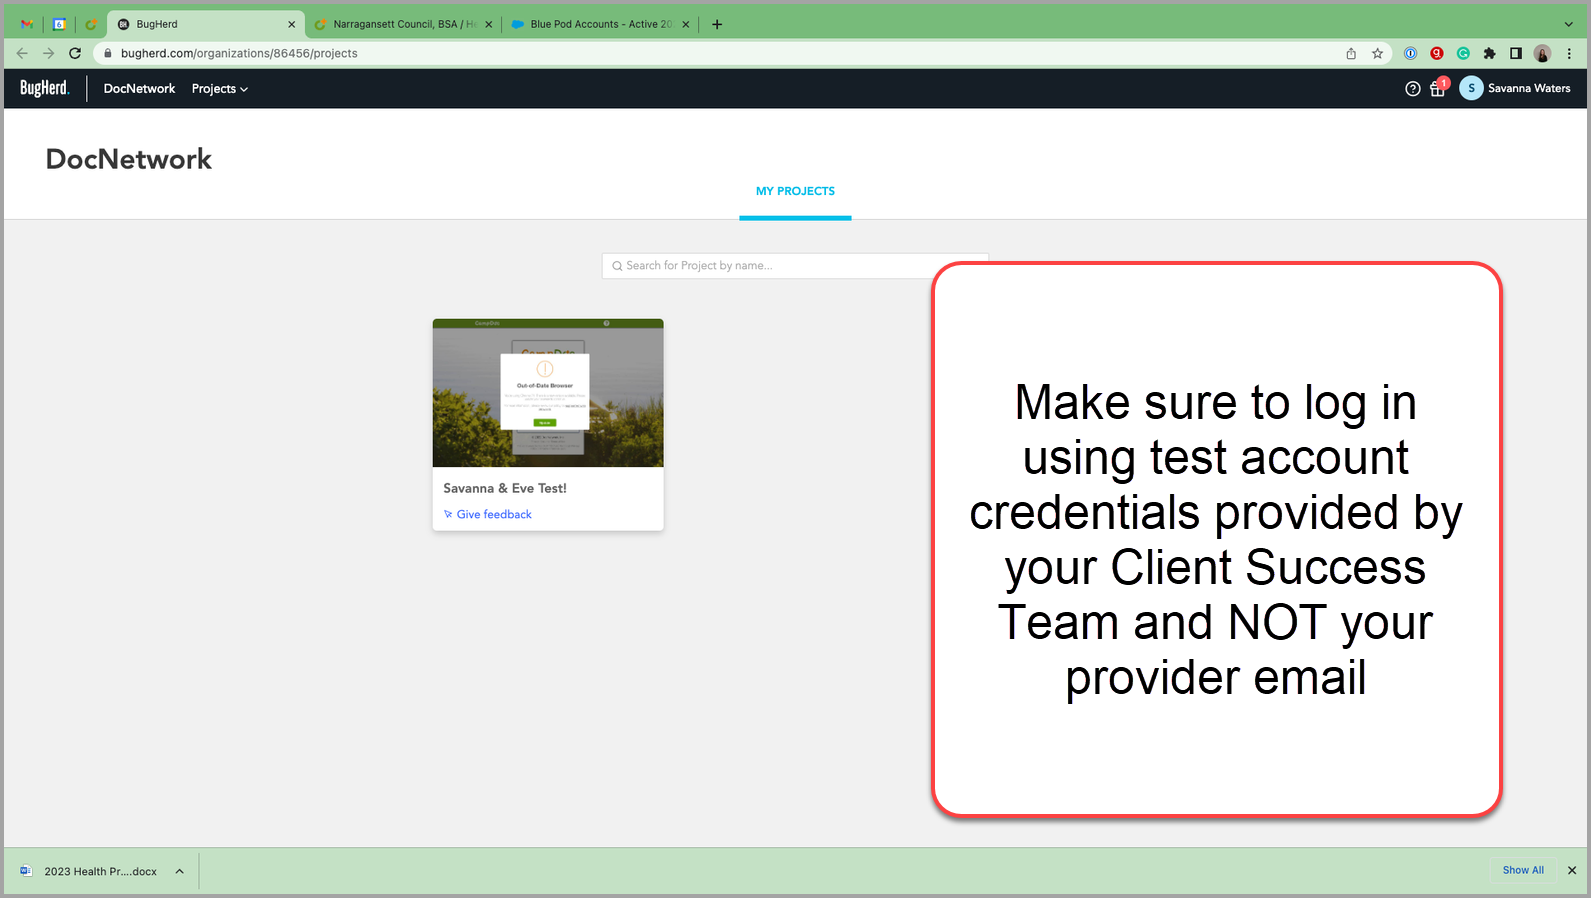
- Once you click “Go to your organization” BugHerd will open.
-
Log in using the test account credentials provided by Client Success Team, and NOT your provider email (your
test account credentials can be found in email from DocNetwork).
-
You should now have access to your test account, and a BugHerd sidebar.
-
If you click the navy BH button in the bottom-right corner of the page,
it will open the sidebar.

[Return to Top]
Documenting Edits
00:03: Well, hi! This is Phil from the DocNetwork training team. 00:06: In
this video, we're going to walk you through how to request edits within the
BugHerd 00:10: tool. If you've gone through the review process in previous
seasons and 00:14: have memories of filling out a Word document, you're about
to see how much easier this 00:18: process is becoming. If you haven't watched
our previous video on setting 00:22: up BugHerd, you may want to watch that
first. 00:26: As a reminder, be sure that you're logged in with your test
account credentials that your team 00:30: sends you, not your provider account.
BugHerd 00:34: makes the editing process much easier by allowing you to note
your 00:38: edits directly in your test profile. You can submit edits two
00:42: different ways by tagging an element or by tagging 00:46: the page.
Either way BugHerd instantly takes a screenshot 00:50: that gets attached
to the task you're creating. Your team will see exactly what 00:54: question
or page you are requesting your edits on and for what test profile 00:59:
or version of the forms. Let's start with tagging 01:02: an element. Tagging
an element can be used to request an edit, on existing 01:06: text, authorizations,
or questions that already appear in your 01:10: health forms. Let's head
over to the health profile to request 01:14: some changes to our forms. Simply
select the step, where 01:19: you want to request your edits. Let's head
over to the camper information page, and 01:23: let's scroll down, and say
we no longer need to ask the 01:27: school attending question. We'll simply
select the plus symbol, 01:33: hover over the question you need to request
an edit - school attending. 01:38: I will say this question can be 01:42:
removed. So once you clicked on that question, this text box appeared, 01:47:
we type our requested edit and we'll simply create the task. 01:52: If you're
replacing the text in an authorization or welcome letter or other areas 01:57:
that might have longer text, you can also upload an attachment. 02:00: Instead
of leaving the text within the description, you may also want to add that
attachment. 02:06: You can do that right here - add attachment and 02:10:
upload it accordingly. If you're adding or replacing a downloadable form,
02:14: you'll use that attachment option as well then simply click create
02:18: task. If you want to tag the page that 02:22: can be used to request
a change, that will affect the entire step or section. 02:27: For example,
remove the entire step from the health profile or 02:32: assign this step
to the staff profiles only. Select 02:37: the page symbol. BugHerd 02:42:
will instantly capture a screenshot of the entire page. 02:46: You can type
your requested edits or you could upload a form 02:49: if you had a new authorization,
perhaps, and click create tasks 02:53: there as well. Now that you've requested
some edits, 02:58: what happens? Well, that's a great question and I'm so
glad that you asked. Your 03:02: edits will save instantly on your team's
project board. In order to make the 03:06: process efficient, the goal is
to process your edits and rounds with a clear start 03:10: and stopping point.
This way we can make a round of edits in your account, all 03:14: at one
time. Once you've completed a round of edits, please 03:18: email your client
success team to communicate that your edits have been submitted. Please 03:23:
make sure you're as thorough as possible when submitting your edits. Each
round of edits takes 03:27: two to four business days for our team to process
and we'll reach out to you, when 03:31: your edits are ready for you to review
and approve. Your team will work through 03:35: the edits and leave comments
indicating, which items are completed. Should CampDoc 03:40: or SchoolDoc
have any questions about any of your edit requests we'll reply to your edit
03:44: request within BugHerd. Review the comments by clicking on the tasks
03:48: on the sidebar. If you'd like to add additional comments to a task
that's 03:52: been updated or if an updated task does not appear to be completed,
03:56: please leave a comment and select the mark as open button to notify
us, 04:01: otherwise it's possible that will go unnoticed. Once all 04:05:
edit requests are complete, your client success team will follow up via email
to finalize the launch 04:09: of your account. Your implementation specialist
will notify you once 04:13: each round of edits is complete and ready for
you to review. 04:16: As a side note, we recommend that you do in fact, turn
off BugHerd notifications 04:20: so that you are not notified each time 04:23:
an individual edit is made. I mean, who really wants those extra 04:27: notifications?
Am I right? To turn off BugHerd notifications, you need 04:31: to be on the
BugHerd page. In the top right corner you'll see your 04:35: name. Click
edit your profile, then click notifications. 04:42: Under notification preferences,
toggle each notification to off. 04:47: You'll know it's off because it's
grayed out. 04:51: Click save at the bottom of the page and then you're all
set. 04:55: Thanks for watching this video, and if you have any questions,
as always, don't hesitate to reach 04:59: out to your team.
BugHerd simplifies the editing process by allowing you to note your edits
directly in your test profile. You can submit edits in two ways:
-
Tagging an Element - used to document an edit on existing
text, authorizations, or questions that appear in your health forms
-
Tagging a Page - used to document a change that will
affect an entire step, e.g. remove the entire step from the health profile.
Please do not submit Video Feedback. In order for us to
capture your feedback and make your updates accurately, please provide your
requests in writing using the Tag an Element or Tag a Page
Tagging an Element
Tagging an Element can be used to document an edit on existing text, authorizations,
or questions that appear in your health forms. To tag an element, do the
following:
-
Select the “+” symbol

-
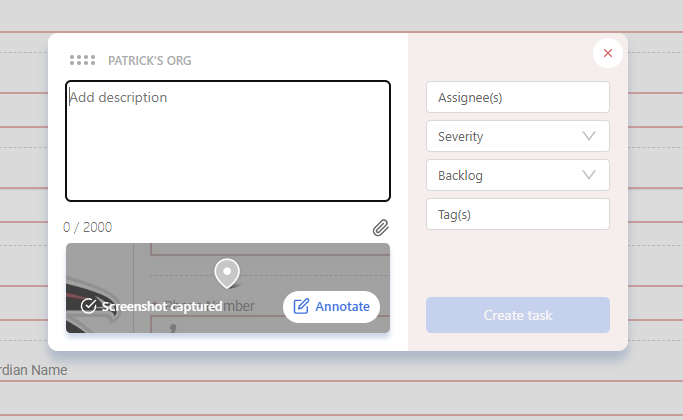
Hover over the question you need to document an edit. A screenshot will
automatically be taken of the element you selected.
- Click on your question, and a text box will appear.
-
Document your edit.
Note: If you are replacing the text in an authorization, welcome letter,
or other areas with longer text, you can also upload an attachment instead
of leaving the text within the description. You may also want to add
an attachment if you are adding or replacing a downloadable form (e.g.
physical form, handbook, packing list, etc.).
- Click “Create Task.”
Tagging a Page
Tagging a Page can be used to document a change that will affect an entire
step, e.g. remove the entire step from the health profile.
-
Select the “page” symbol.

-
BugHerd will instantly capture a screenshot of the entire page.
- Document your edit(s).
-
Click “Create Task.”
[Return to Top]
The Editing Process
Here is what you need to know about the editing process:
-
Your edits will save instantly on your CampDoc / SchoolDoc team's project
board.
-
Try to edit in rounds with distinct start and stop points. This allows
us to address all your account edits at once. After completing a round,
email your Client Success team.
-
Please make sure you are as thorough as possible when documenting your
edits. Each draftset will take 1-3 business days to review. Once your
draftset is reviewed by your team, we will reach out if we are ready
to apply changes, or if further discussion is needed.
-
Your Client Success Team will review your changes and may leave comments
indicating which items are completed. Should CampDoc / SchoolDoc have
any questions about any of your edit requests, we will reply to your
edit request in BugHerd.
-
Review the comments by clicking on the tasks on the sidebar. Once all
edits are complete, your Client Success team will follow up via email
to finalize the launch of your account.
[Return to Top]
Turning Off BugHerd Notifications
Your Implementation Specialist will notify you once each round of edits is
complete and ready for you to review. We recommend
turning off BugHerd notifications so that you are
not notified each time an individual edit is made.
To turn off BugHerd notifications:
- Click on your name in the upper right-hand corner.
- Click “Edit your Profile”
- Click “Notifications”
-
Under Notification Preferences, toggle each notification to off (grayed
out)
-
Click “Save” at the bottom of the page
00:24:
[Return to Top]